Pages

Tuesday, November 29, 2011

Stained Glass Cookies

I have recently been introduced to Pinterest and love it! I am continually amazed at how creative so many people are. It has definitely inspired me to be more crafty. I have only attempted to make a couple of the crafts, but I am definitely inspired and hopefully will make some more fun things. I also love it for bookmarking recipes I want to make. That is originally what sparked my curiosity of these cookies. I saw them pinned on someones board and thought they were the coolest things. Then when I saw how they made them I just knew I had to try it. On my first attempt I tried to use sprinkles. Let me tell you that this did not work. Sadly the sprinkles didn't melt. Who would have ever thought that sprinkles wouldn't melt? Next I tried Jolly Ranchers and they worked like a charm! These turned out so cute and can be made so festive!


Stained Glass Cookies

INGREDIENTS:
1 1/2 cups (3 sticks) butter, softened to cool room temperature
1 1/2 cups granulated sugar
1/2 cup powdered sugar
4 large eggs
1 teaspoon vanilla
1/2 teaspoon almond extract
1 tablespoon lemon zest (from about 1 lemon)
5 cups all-purpose flour
2 teaspoons baking powder
1 teaspoon salt
40 fruit flavored hard candies
DIRECTIONS:
Preheat oven to 400 degrees. Line cookie sheets with silpat or tin foil. I used both, un-greased, and they both worked great.

Place hard candies in a Ziploc bag and crush with a meat tenderizer, rolling pin, or hammer. Don't worry about all the pieces being finely crushed. I had some bigger chunks and they still melted beautifully.

In a large bowl, cream together the butter and sugars for 3-4 minutes, until the mixture is light and fluffy. Add the eggs one at a time, mixing well after each addition. Add vanilla extract, almond extract and lemon zest; mix. Add two cups flour, baking powder and salt. Mix. Add remaining flour and mix just until flour is incorporated and the dough is smooth and soft.

The dough can be wrapped in plastic wrap and kept in the refrigerator for up to a week or it can be rolled out right away. Dust a counter with powdered sugar or flour and roll the dough to desired thickness (I prefer my cookies on the thick side so I roll my dough out to about 1/4-inch, maybe even slightly thicker than that). Cut the dough into shapes. Cut out the center of your cookies that you want the "stained glass" appearance.  Place the cookies on a lined or lightly greased baking sheet. Fill center area with the crushed hard candies. I used about 1/2-1 tbs of the crushed candies in each of my cookie centers. Bake for 7-8 minutes. The cookies won’t appear browned on top (or on bottom) when they are done baking so don’t let them over bake! The hard candies will melt and bubble a little bit. Just make sure you candy is all melted. Let cool for a few minutes on the baking tray. Once candy center has cooled and is solid remove from baking sheet and place on wire cooling rack. You can eat as is or decorate with extra frosting as desired.


Recipe Source: Inspiration for stained glass cookies from here. The actual sugar cookie recipe I got from Mel's Kitchen Cafe

Sunday, November 27, 2011

Sans Rival Cake

Catherine of Munchie Musings was our November Daring Bakers’ host and she challenged us to make a traditional Filipino dessert – the delicious Sans Rival cake! And for those of us who wanted to try an additional Filipino dessert, Catherine also gave us a bonus recipe for Bibingka which comes from her friend Jun of Jun-blog.

This cake is quite delicious. It is not too rich, but still has a delicious flavor. I think my favorite part of this cake was honestly the frosting. This frosting has a subtle sweetness and is oh so smooth and creamy! It seriously melts in your mouth! I think this recipe is definitely a keeper for me! The only thing I changed is that I used almonds instead of cashews and loved it. I'm not a big cashew person so feel free to use them if you prefer.


Sans Rival Cake

Preparation time:  
Batter prep: 20 minutes
Baking: 30-60 depending on layers
Frosting: 30 minutes
Assembly: 15 minutes

Ingredients
10 large egg whites, room temp
1 cup (240 ml) (225 gm) (8 oz) white granulated sugar
1 teaspoon (5 ml) (3 gm) cream of tartar
¼ cup (60 ml) (20 gm) (2/3 oz) Dutch processed cocoa
(optional and not traditional) 
2 cups (480 ml) (240 gm) (8½ oz) chopped, toasted almonds 

Directions:
Note: You will need four layers which will mean that you might have to bake in two batches. Be sure to use fresh parchment paper and cooled pans for each batch.

1. Preheat oven to moderate 325°F/160°C/gas mark 3.
2. Line cake pan bottoms with parchment paper and butter and flour the sides really well. 
3. In a large clean, dry glass or metal mixing bowl, beat egg whites on medium until foamy (2 mins.).
Sprinkle with cream of tartar. Gradually add sugar, a couple of tablespoons at a time, continuing to
beat now at high speed until stiff shiny peaks form.  (about 7-10 mins.) 
4. Fold in nuts, reserving enough to use for decoration. 
5. Divide meringue into four equal parts. Spread in pans, evenly to edges. If doing batches, use fresh
parchment paper and cooled pans for each batch.  
6. Bake in preheated oven for 30 minutes, or until golden brown. Remove the meringue from the
baking pans while still hot; allow to cool slightly. Peel off the parchment paper while it is still warm,
it is difficult to remove sometimes when they have completely cooled.  
7. When cool, trim edges so that all 4 meringue layers are uniformly shaped. Set aside.


French Buttercream:

Ingredients
5 large egg yolks, room temperature 
1 cup (240 ml) (225 gm) (8 oz)  white granulated sugar
1/4 cup (60 ml) water 
1¼ cup (300 ml) (2½ sticks) (285 gm) (10 oz) unsalted butter, room temperature 
Optional Flavorings: 2 oz (55 gm) unsweetened chocolate, melted, or 1½ teaspoon (7 ½ ml) almond extract,
or 1½ teaspoon (7 ½ ml) vanilla extract, or any flavor you like

Directions:

1. Put the egg yolks in a mixing bowl. Beat at high speed until the yolks have doubled in volume and
are a lemon yellow.
2. Put the sugar and water in a heavy pan and cook over medium heat, stirring the sides down only
until all the sugar is dissolved and the syrup reaches 235°F/112°C (or thread stage). 
3. With the mixer on high, very slowly pour the syrup down the sides of the bowl, until all has been
added. Be careful as the very hot syrup could burn you if it splashes from the beaters. Continue
beating on high until the mixture is ROOM TEMPERATURE (about 15 mins). Still on high, beat in
the soft, room temperature butter a tablespoon at a time. Add flavoring after you beat in the butter.
Refrigerate the buttercream for at least an hour, and whip it smooth just before you use it. 

Assembly: 
Set bottom meringue on cake board with a dab of butter cream to hold it in place. Spread a thin
layer of buttercream and then place another meringue on top. Repeat with a thin layer of 
buttercream, meringue, thin layer of  buttercream, meringue, and finally buttercream the top and
sides. Decorate with reserved nuts.

Friday, November 25, 2011

Nutella Oatmeal Cookie Bars

With Thanksgiving being yesterday I just can't help but feel overwhelmingly lucky for the wonderful life I get to live. I have a wonderful husband, we are surrounded by wonderful family, we have a roof over our head and food on our table. Life really is good. Do you know what else is really good? Yep you guessed it, these bars! I absolutely love them with Nutella on top! My husband would prefer them with dark chocolate. Just know your options for topping these babies can be changed to suit your personal liking.


Nutella Oatmeal Cookie Bars
Prep time: 15 minutes
Bake time:25-30 minutes
Servings: 9

2 cubes (1 cup) butter, softened
1 cup brown sugar
1 egg
1 cup sifted flour
1 cup rolled oats
1/4 cup Nutella

Cream butter, sugar and egg. Add flour then oats. Mix well. Spread in greased 9" x 9" pan. Bake at 350 degrees for 25-30 minutes. Remove pan from oven and let stand for a couple of minutes. Spread Nutella on top. It spreads easier as it warms up a little on the warm bars. When cooled, cut into bars. I usually refrigerate them to get them to cool faster to cut into bars, but then I like to eat them at room temperature.

Wednesday, November 23, 2011

Pumpkin Pie Dessert

What would Thanksgiving be without some sort of pumpkin pie? Now what would you do if you didn't like pumpkin pie? Maybe its not so much the pumpkin but the pie part of pumpkin pie that you don't like. I of course am not talking about myself, but if I were to be honest I would have to say I prefer my pie to be apple. When it comes to pumpkin pie I think I would be completely satisfied if all of my pumpkin pies were actually this dessert! It has the right amount of pumpkin, and a delicious amount of cakey buttery goodness to make this dessert worthy of replacing all the pumpkin pies in the world (in my opinion). So if you know any picky pumpkin eaters this is definitely a recipe you will have to try!


Pumpkin Pie Dessert

Prep time: 30 minutes
Bake time: 1 hr
Servings:12-15

Ingredients:

Crust
2 cups homemade cake mix
1 egg
1/2 cup melted butter

Filling
24 oz pumpkin
1 cup sugar
2 eggs
2/3 cup milk
1 tsp cinnamon
1 tsp ground ginger
1/4 tsp ground cloves

Topping
1 cup Homemade cake mix *

1/4 cup sugar
1 tsp cinnamon
1/4 cup butter chilled

Directions:
Grease the bottom only of a 9X13 pan. Preheat oven to 350 degrees. Combine the crust ingredients in a medium bowl. Spread mixture into the prepared pan.

In the same bowl combine filling ingredients. Mix until well incorporated. Pour filling mix over the crust mixture.

In a small bowl combine the 1 cup of homemade cake mix, sugar, and cinnamon. Cut in chilled butter. Sprinkle topping over the pumpkin mixture.

Bake in preheated oven for 50-60 minutes, or until a knife inserted into the center comes out clean.

Serve warm or at room temperate. The cake holds together a little bit better at room temperature or chilled. Serve with whipping cream on top and enjoy!

*I absolutely love the homemade cake mix in this recipe. The flavor is fantastic, but if you don't have some of the homemade stuff in your freezer like I do, and don't feel like making some you can substitute the homemade cake mix for a box cake mix. You might have to add more butter to the crust mixture, but know that it is an option.

Monday, November 21, 2011

Super Simple Pizza Dough

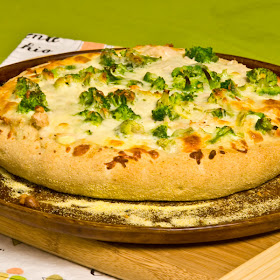
I will be completely honest with all of you. Most days I don't plan what we are going to eat at all. I am always thinking last minute hmmm what should we have for dinner? I know this isn't the best way to be, but for right now it is just how it always seems to end up. Well recipes like this one are a dream come true for me. Granted this dough might not be the absolute best pizza dough ever in life, but for how quick and easy (almost no rising time) it is you can't beat it! This dough is exactly what it sounds like, a very basic dough that is perfect for my last minute pizza cravings. And to be quite honest I really enjoyed the dough (I may or may not have wrapped the dough around some extra mozzarella to make it stuffed crust)


Super Simple Pizza Dough

Yield 1 14-inch thick crust pizza or 2 12-inch thin crust

Ingredients
2 1/2 cups all-purpose flour, or as needed *
1 envelope instant or rapid rise yeast
3/4 teaspoon salt
1 cup very warm water (120 degrees F to 130 degrees F)
2 tablespoons olive or vegetable oil
Cornmeal


Directions
In a large bowl, combine 2 cups flour, undissolved yeast, and salt. Stir very warm water and olive oil into flour mixture. Stir in enough remaining flour to make soft dough. Knead on lightly floured surface until smooth and elastic, about 4 to 6 minutes. Cover; let rest on floured surface 10 minutes.
Lightly oil 1 (14-inch) or 2 (12-inch) round pizza pan(s). Sprinkle with cornmeal. Shape dough into smooth ball. Divide and roll dough to fit desired pan(s). Top pizza as desired. Let rest in a warm place for about 10 minutes prior to baking.

Bake at 400 degrees F for 20 to 30 minutes or until done. Baking time depends on size and thickness of crust and selected toppings.

*For whole wheat pizza dough replace 1 cup of the all-purpose flour with whole wheat flour.


Recipe Source: Allrecipes

Friday, November 18, 2011

Homemade Baked Tater Tots

I have slightly been on a baking drought lately. You see we went to Disneyland last week. Disneyland is wonderful and magical, but for some reason they wouldn't let me down into their magical kitchens to let me create things of my own. Strange I know. The day we got back from Disney I came down with a nasty cold. It is very hard for me to cook when I can't smell, taste, or really stand for long periods of time. Today I'm finally feeling a little better and I can taste so what do I do? Of course make some new creations!

I decided I wanted to try and make these at about 4:30 this morning. I woke up and couldn't go back to sleep and the only things I could think of were the things I wanted to make. This one being in the forefront of my mind. I kept thinking of how I was going to make them, and what spices i wanted in it. I eventually did fall back to sleep, but as soon as I woke up I knew what I needed to do! This was a fun experiment that turned out quite yummy! The unhealthy side of me would still have to admit that I slightly prefer the deep fried kind, but the healthy side of me often tries to suppress the unhealthy side and occasionally wins! Luckily with these bad boys both sides were pleasantly satisfied with them.


Homemade Baked Tater Tots

Prep time: 15 minutes
Bake time: 30 minutes
Makes about 30 mini tater tots

Ingredients:
4 medium sized potatoes
1 1/2 tsp salt
1 tsp smoked paprika
1/2 tsp pepper
1 egg slightly beaten
1 tbs oil
1/2 cup all purpose flour

Directions:
Wash and skin potatoes. Using a food processor with the shredding disk attached shred all four potatoes. You can shred them by hand if you don't have a food processor, but it is much faster with the food processor. With your hands scoop the shredded potatoes out of the food processing bowl and transfer to a medium sized bowl slightly squeezing with your hands to removed some of the excess juice from the potatoes. Add the salt, smoked paprika, pepper, egg, and oil to the shredded potatoes. Mix with a fork until well combined. Add flour and mix again with a fork.

Prepare a mini muffin pan by lightly spraying with cooking spray. You can also use a regular muffing pan if you don't have a mini one, your tots will just be bigger. Scoop about 1/2 tbs of potato mixture into each mini muffin tin. Pressing down slightly with the back of measuring spoon to make the potato mixture as flat as possible. Bake in a preheated 375 degree oven for 30 minutes or until golden brown and crispy. I flipped all of mine half way through the baking time just to make sure they would be crispy on all sides. I wanted mine a little on the crispy side so when they were about done I turned on the broiler and let them crisp up for just a few minutes. If you do this watch them carefully as to not let them burn. Remove from oven and place tots in a bowl and sprinkle a little extra salt on them. Serve plain or with whatever sauce you would like.

Tuesday, November 15, 2011

Canned Apple Pie Filling

We just returned from a little get a way to Disneyland. Disneyland is wonderful, and this is my first time seeing it around Christmas time. We are still over a month away from Christmas, but they already have the place pretty decked out! I hear that on Christmas they actually make it snow there! Someday I'm going to have to see that. Of course being a lover of food I enjoyed all the things we ate there. They have some amazing corn dogs. I have a new found desire to figure out hot to make their corn dogs. They really were delicious (in the most unhealthy kind of way). Hopefully someday I can share the recipe with all of you!

Before we left for Disney land a friend and I got together and made canned apple pie filling. I absolutely love this stuff. We made the same stuff last year, and I used it all year round. I recently ran out and was so very sad. It is so nice to have it whenever I want to make an apple pie, or an apple crisp/cobbler. Really 99% of the time I make apple crisp. Oh how I love apple crisp! This recipe really isn't hard at all and you can have your own homemade pie filling to use whenever. I prefer to make a big batch, this way I have lots to last me a while.


Canned Apple Pie Filling
Yields: 7 quarts

Ingredients
4 1/2 cups white sugar
1 cup cornstarch
2 teaspoons ground cinnamon
1/4 teaspoon ground nutmeg
2 teaspoons salt
10 cups water
3 tablespoons lemon juice
2 drops yellow food coloring
9 pounds apples


Directions
In a large pan, mix sugar, cornstarch, cinnamon and nutmeg. Add salt and water and mix well. Bring to a boil and cook until thick and bubbly. Remove from heat and add lemon juice and food coloring.

Sterilize canning jars, lids and rings by boiling them in a large pot of water. I cheated and just put them in the dishwasher. This worked well enough for me.

Peel, core, and slice apples. Pack the sliced apples into hot canning jars, leaving a 1/2 inch head space.
Fill jars with hot syrup, and gently remove air bubbles with a knife.

Put lids on and process in a water bath canner for 20 minutes.

Recipe Source: Allrecipes

Thursday, November 10, 2011

Butter Toffee Popcorn

I know I have several different popcorn recipes on this site. I kinda love sweet delicious popcorn! I also love the salty, buttery and even cheesy kind of popcorn (note to self - figure out how to make cheese popcorn). I mentioned when I posted my soft caramel popcorn recipe that I also had a crunchy popcorn recipe that I loved. I have a really hard time deciding which one I like better. My husband on the other hand chooses this one. I will admit that once I start eating this popcorn I can't stop! It is kinda like Cracker Jacks but better! The salty peanuts also give it a new depth of flavor that is fantastic. Don't worry I have made it without peanuts too and I love it just as much, so if your not a peanut fan feel free to leave them out. Either way you make it this popcorn is bound to disappear fast!


Butter Toffee Popcorn

Prep Time: 15 minutes
Bake Time: 1 hr
Makes about 18 cups of toffee popcorn

INGREDIENTS:
3/4 cup unpopped popcorn kernels, white or yellow
2 sticks butter
2 1/4 cups light brown sugar
3/4 cup dark corn syrup
1/2 teaspoon salt
2 teaspoons pure vanilla extract
1 teaspoon baking soda
2-3 cups roasted, salted peanuts
DIRECTIONS:
Preheat the oven to 250 degrees. Grease two large rimmed baking sheets and set aside.

Pop the popcorn kernels, in shifts if needed to ensure your popcorn popper doesn’t burn the popcorn, and place the popcorn in a large bowl, sifting through to remove the unpopped kernels.
In a large saucepan over medium heat, melt the butter. When melted add the brown sugar, corn syrup, and salt. Bring to a boil while stirring. Once the mixture starts boiling, reduce the heat to medium-low and simmer, stirring often, for 3 minutes. The mixture will be slightly thickened. Take the pot off the heat and stir in the vanilla and baking soda. The mixture will bubble so be careful. Pour the caramel over the popcorn and mix slightly. Add the peanuts and mix well but gently (so you don’t break apart the popcorn) until the popcorn is evenly coated and the peanuts are distributed through the mixture.

Turn the popcorn out onto the baking sheets, spreading into an even layer. Bake the popcorn for one hour, stirring and tossing every 20 minutes. Move the bottom tray to the upper rack and vice versa each time you stir. The popcorn will deepen in color and harden a bit as the caramel bakes and sets. Cool the popcorn to room temperature. Store in an airtight container. I’ve found the popcorn will keep, stored tightly, for 1-2 weeks.

Recipe Source: Mel's Kitchen Cafe

Monday, November 7, 2011

Pizzookie

A few years back before my husband and I were married we both went to different dessert places (in 2 different states) and happened to both try these things called pizzookies (pizza cookie). He came back home and was raving about this ingenious idea and I concurred completely. Of course anytime I try something that is absolutely fantastic I have to try and create it myself. For my birthday that year he bought me 4 individual sized skillets. We have had pizzookies several times since then and I absolutely love them. The "individual" sized skillets really are big enough that 2 or 3 people could share one (unless you really like sweets, which I do). They really are so simple to make, and always a crowd pleaser! I usually have some left over cookie dough in the freezer that I have already shaped into cookie sized balls and am able to though a couple of those in my skillets and bake them up. They make a fun quick dessert.

 Pizzookie

Prep time: 20 minutes
Cook Time:15 minutes
Servings: Varies

Ingredients:
1 batch of your favorite cookie dough (I used the Perfect chocolate chip cookie dough)
Your favorite ice cream (This Cinnamon ice cream goes surprisingly well)
Hot fudge
Caramel

Directions:
Lightly grease 4- 6 inch skillets is not already well oiled. Preheat oven to 375 degrees. Press enough cookie dough into skillets to mostly cover the bottom.  Place in preheated oven and bake for 12-15 minutes. Cookies should be slightly brown on the edges, but still look slightly gooey in the center. This is the way I like them, but you are welcome to bake them longer if you want them more done. Remove from oven and top with ice cream and hot fudge and caramel if desired. The idea of these are to be an ooey delicious mess. Be careful with the skillets as they will remain hot for a while. One skillet was more than plenty for 2 people to share. For smaller portions this could also be made using ramekins. Happy eating!

Note: I often keep cookie dough in my freezer and just pull a few cookie dough balls and make these whenever my heart so desires.


This is about how much cookie dough I used. I figure its about 3-4 cookies worth :)


This is how it looked fresh out of the oven. Pre ice cream!


The delicious finished project! The more the ice cream melts the more I love it!


Thursday, November 3, 2011

White Chicken Chili

I don't know about you all, but around here it is starting to get cold and I'm not sure I'm ready for it. We have had a beautiful fall (kinda unusual), but it has been so great that I don't want to see it go. I actually had frost and ice on my car this morning as I left for work. I cried a little then refused to scrape it and resorted to using my windshield wiper fluid. It actually turned out to be a very beautiful day, I just wish it were warmer. Since Mother Nature doesn't seem to be listening to my requests for shorter winters (preferably the month of December only) and it continues to get cold around here I decided that I should give in and make this soup to console myself. Luckily this soup is fantastic and eased the pain of cold weather, at least until tomorrow.

I got this recipe from a gal I work with. She brought a big pot of this to a work pot luck years ago. I am not a huge chili fan and was slightly skeptical if I would like it. I almost didn't try it that is how skeptical I was. Everyone kept raving about it so I gave in and tried a little. Boy am I glad that I did! This really is the best chili I have ever had. It has a very subtle kick to it, but just enough to give it a delicious flavor. The best part is that it comes together pretty quickly.  I usually make a big batch of chicken in a crock pot, shred it, and keep it in the freezer with 2 lbs in each bag. Then when I'm ready to make anything that calls for chicken I can just pull one out and use it.


White Chicken Chili
Prep time: 10 minutes
Cooking time: 15 minutes
Servings: 10

Ingredients:
2 lbs shredded chicken
3 cups chicken broth
5-6 (15 oz) cans white beans drained.
1 (6 oz) can fire roasted whole chiles sliced
1 (16 oz) jar chili Verde salsa
1 tbs minced garlic
1/3 cup white cooking wine
1 pint sour cream

Directions:
Combine all ingredients except the sour cream in a large pot. Place over medium high heat and bring to a boil. Boil for about 5 minutes to make sure everything is heated through and all the flavors are combined. Just prior to serving mix in sour cream.


Thanks Hailey for the amazing recipe!

Tuesday, November 1, 2011

Brown Sugar Cookies

I love cookies! I love these cookies! I love cookie dough! I pretty much love anything that involves cookies! Obviously since it was Halloween yesterday I had to make cookies. I mean what else do you do on Halloween? There is not nearly enough candy and sugar floating around that I just had to make cookies as well. And not just any cookies. I had to make these cookies. Sugar cookies are wonderful. A good sugar cookies is fantastic. A sugar cookie that involves browned butter and brown sugar...WOW. You all know by now the soft spot I have in my heart for browned butter right? Yep I love it. These cookies did not change my love for browned butter at all.  If anything it might have increased my love for it. It really just adds so much richness and caramel like flavor to every recipe.

 Brown Sugar Cookies

Ingredients:
  • 14 tablespoons unsalted butter (1 3/4 sticks)
  • 1 3/4 cups packed dark brown sugar
  • 2 cups unbleached all-purpose flour plus 2 tablespoons
  • 1/2 teaspoon baking soda
  • 1/4 teaspoon baking powder
  • 1/2 teaspoon table salt
  • 1 large egg
  • 1 large egg yolk
  • 1 tablespoon vanilla extract
  • 1/4 tsp almond extract (optional)

Directions:

  1. In 10-inch skillet over medium-high heat, heat 10 tablespoons butter until melted, about 2 minutes. Continue to cook, stirring constantly until butter is dark golden brown and has nutty aroma, 1 to 3 minutes. Remove skillet from heat and transfer browned butter to the heat-proof bowl of a stand mixer. Stir remaining 4 tablespoons butter into hot butter to melt; set aside to cool for 15 minutes.
  2. While butter is cooling, adjust oven rack to middle position and heat oven to 350 degrees. Line 2 baking sheets with parchment paper.
  3. In medium bowl, whisk together flour, baking soda, and baking powder; set aside.
  4. Add 1 3/4 cups brown sugar and salt to bowl with cooled butter; attach paddle and mix on medium-low speed until no sugar lumps remain, about 30 seconds. Scrape down sides of bowl with rubber spatula; add egg, yolk, almond extract and vanilla and mix on medium-low speed until fully incorporated, about 30 seconds. Scrape down bowl. Add flour mixture and mix until just combined, about 1 minute.
  5. Roll into a 1 round balls. Place on a silpat lined cookie sheet. Flatten cookie slightly with palm of hand or bottom of a drinking glass.
  6. Bake one sheet at a time until cookies are browned and still puffy and edges have begun to set but centers are still soft (cookies will look raw between cracks and seem underdone); 12 to 14 minutes.
  7. Transfer the baking sheet to a wire rack and let the cookies cool on the sheet for 5 minutes then using a wide metal spatula, transfer the cookies to the rack to cool completely.
  8. If desired frost cooled cookies. I used this frosting and loved it!
Yields: 24 cookies

Recipe Source: Adapted from Sweet Pea's Kitchen